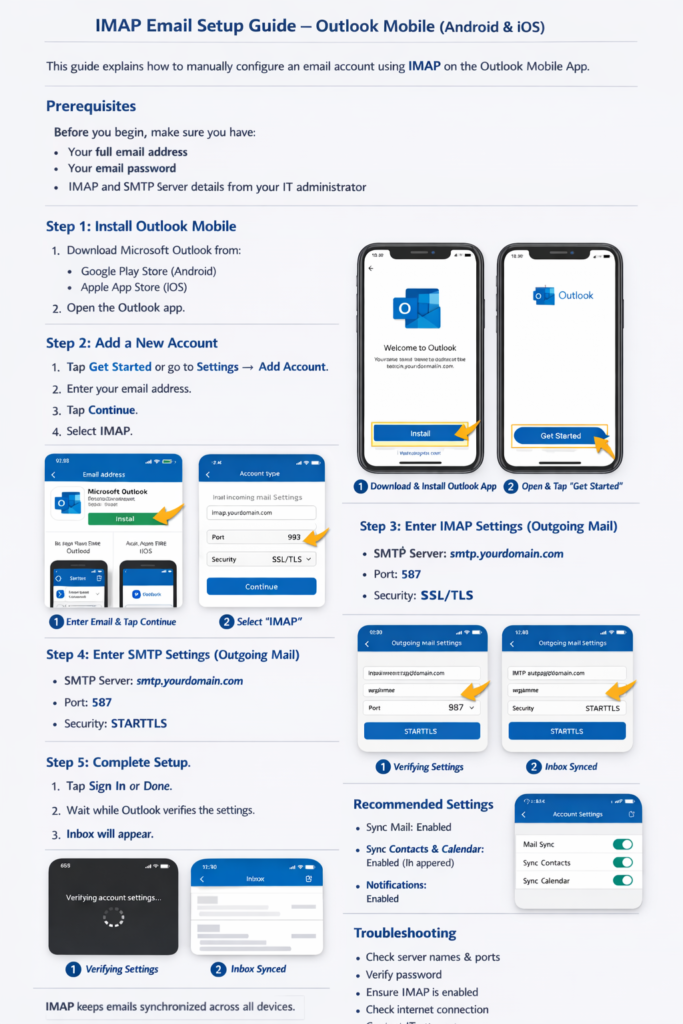
Knowledgebase

knowledgebase List

We collaborate with the providers of best-of-breed technologies, services, and other streams.

image

Knowledgebase

Email Hosting

( Desktop ) IMAP Email Setup Guide – Outlook Desktop (Windows & macOS)

This guide explains how to manually configure an email account using IMAP in Microsoft Outlook on a desktop computer.

Prerequisites

Before you begin, ensure you have:

  • Your full email address
  • Your email password
  • IMAP and SMTP server details from your IT administrator

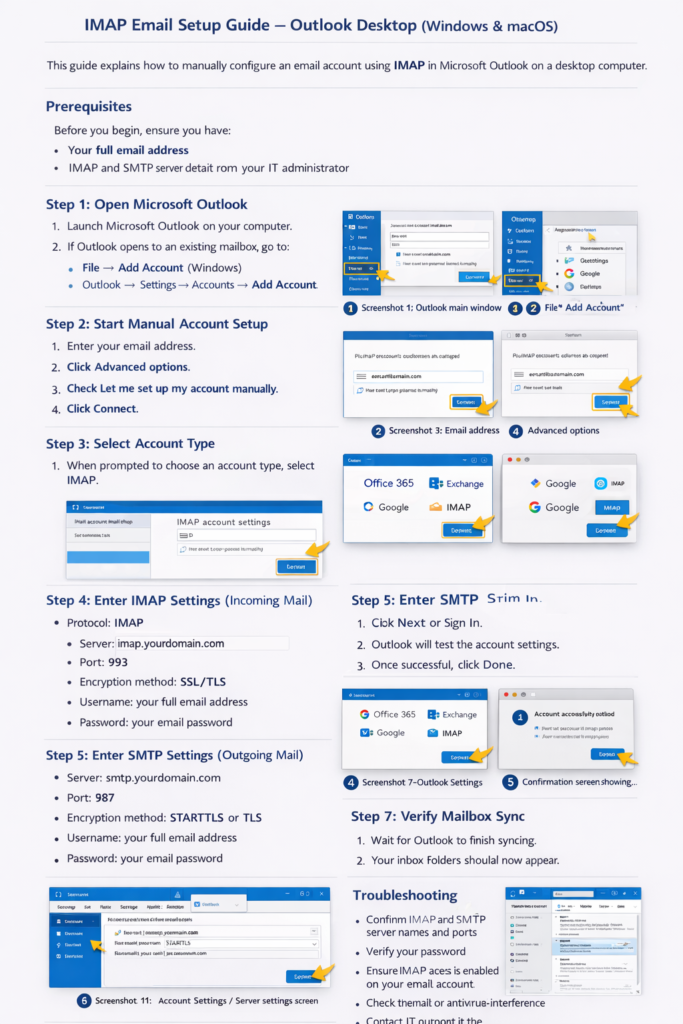
Step 1: Open Microsoft Outlook

  1. Launch Microsoft Outlook on your computer.
  2. If Outlook opens to an existing mailbox, go to:
    • File → Add Account (Windows)
    • Outlook → Settings → Accounts → Add Account (macOS)

Step 2: Start Manual Account Setup

  1. Enter your email address.
  2. Click Advanced options.
  3. Check Let me set up my account manually.
  4. Click Connect.

Step 3: Select Account Type

  1. When prompted to choose an account type, select IMAP.

Step 4: Enter IMAP Settings (Incoming Mail)

Fill in the Incoming mail details:

Protocol: IMAP
Server: imap.yourdomain.com
Port: 993
Encryption method: SSL/TLS
Username: your full email address
Password: your email password

Step 5: Enter SMTP Settings (Outgoing Mail)

Fill in the Outgoing mail details:

Server: smtp.yourdomain.com
Port: 465
Encryption method: STARTTLS or TLS
Username: your full email address
Password: your email password

Step 6: Complete Setup

  1. Click Next or Sign In.
  2. Outlook will test the account settings.
  3. Once successful, click Done.

Step 7: Verify Mailbox Sync

  1. Wait for Outlook to finish syncing.
  2. Your inbox folders should now appear.

Recommended Settings

  • Download email for the past: All
  • Use cached Exchange mode: Disabled (IMAP accounts)
  • Leave messages on server: Enabled

Troubleshooting

If setup fails:

  • Confirm IMAP and SMTP server names and ports
  • Verify your password
  • Ensure IMAP access is enabled on your email account
  • Check firewall or antivirus interference
  • Contact IT support if the issue persists support@hostnasi.co.tz
Email Hosting

(Mobile) IMAP Email Setup Guide – Outlook Mobile (Android & iOS)

This guide explains how to manually configure an email account using IMAP on the Outlook Mobile App.

Prerequisites

Before you begin, make sure you have:

  • Your full email address
  • Your email password
  • IMAP and SMTP server details from your IT administrator

Step 1: Install Outlook Mobile

  1. Download Microsoft Outlook from:
    • Google Play Store (Android)
    • Apple App Store (iOS)
  2. Open the Outlook app.

Step 2: Add a New Account

  1. Tap Get Started (or Settings → Add Account).
  2. Enter your email address.
  3. Tap Continue.
  4. When prompted, select IMAP (or Advanced SetupIMAP).

Step 3: Enter IMAP Settings (Incoming Mail)

Fill in the following details:

Account Type: IMAP
Email Address: your full email address
Username: your full email address

IMAP Server:

  • Server: imap.yourdomain.com
  • Port: 993
  • Security Type: SSL/TLS

Step 4: Enter SMTP Settings (Outgoing Mail)

SMTP Server:

  • Server: smtp.yourdomain.com
  • Port: 465
  • Security Type: STARTTLS or TLS

Authentication:

  • Username: your full email address
  • Password: your email password

Step 5: Complete Setup

  1. Tap Sign In or Done.
  2. Wait while Outlook verifies the settings.
  3. Once successful, your mailbox will begin syncing.

Recommended Settings

  • Sync Mail: Enabled
  • Sync Contacts & Calendar: Enabled (if supported)
  • Notifications: Enabled for real-time alerts

Troubleshooting

If setup fails:

  • Double-check server names and ports
  • Ensure your password is correct
  • Confirm IMAP access is enabled on your email account
  • Verify your internet connection
  • Contact IT support if the issue persists on support@hostnasi.co.tz

Please note

  • IMAP keeps your emails synchronized across all devices.
  • Deleting an email on one device will remove it from others.

24/7 World-Class Support

Ran into trouble? Contact our Customer Success team any time via live chat or email.

Need help choosing a plan?

Need help? We're always here for you.